Happy Birthday, America! Let's Celebrate our Independence! Well, almost. But first, I thank you for joining me and the super talented designers from the CardMaker Blog Team and the Clearsnap Team, as we Blog Hop together today sharing our one of a kind projects using amazing Colorbox Chalk inks. (see tutorial and a supply list below)
Challenges:
DoubleClick - AKA Abusybee-Challenge: For a Man or Boy!
Little Tangles Challenge #69- Embossing
Split Coast Stampers Challenge: CAS383-Good Ole Red, White, & Blue
CAS-ual Fridays: CFC151 -- Color Challenge
The complete Blog Hop List is below in case anyone gets lost:
CardMaker
Rose Powell
Dawn Lusk
Dana Tatar
Carisa Zglobicki
Jennifer Priest
Pamela Haskin
Chana Malkah Harris
Lisa Silver
Kymona Tracey
Kim Klinkovsky <= you are here
Linda Beeson
Clearsnap <= Giveaway has ended

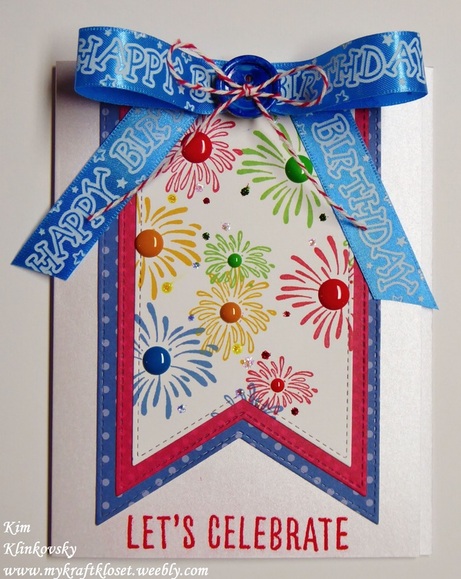
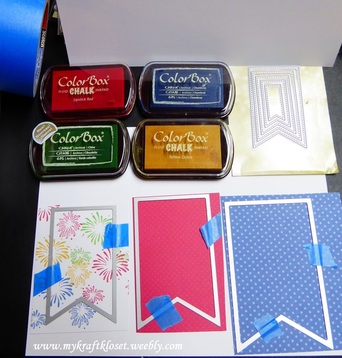
I stamped these fun fireworks on white cardstock in various chalk inks. And as you can see, they are not pastel, like the word "chalk" implies. They do come in an array of vibrant colors. I cut the fireworks out with fishtail die cuts, but they look like flags to me. Don’t you think? As you can see, I used blue painters tape to hold my die cuts in place. I have a magnetic base plate, but I always forget to us use it. Then cut red and blue flags from larger die cuts and adhered them all together. And attach the whole piece to the card base. As shown above.
It wouldn’t be a card from me if it didn’t have some bling. Right? So, I added some random stickles glitter glue for some sparkle and enamel dots in these amazing coordinating colors. Set aside to dry.
You’d think I’d have a blue button in my stash, but I didn’t. So, not to fret, I just made my own. Why not, right? I took an ivory button (looks yellow here, but it was much lighter-really) and colored it with an alcohol marker (Copic) and held the button with a Quikstick so I wouldn’t get marker all over my hands. A toothpick would work too. Or something narrow enough to fit in the button hole to hold it still. It takes several layers to go over the plastic button, but the results are amazing. It kind of looks marbled.
Set aside to dry.
I wanted the words to show on the blue “happy birthday” ribbon, so I made this bow from 3 pieces. First I made two loops on each side with the ends coming together in the middle. Then stapled it together in the middle. (you won't see the staples, because it will be covered up by the button). Next cut a piece of bakers twine and tied that in the middle of the blue ribbon too, so it would gather a little. Then thread the bakers twine through the button holes and tie in a bow. Adhere bow to card with a glue dots. Then cut two strips of blue ribbon for the tails and adhered them under the bow with glue dots. Voila! A birthday card for America or maybe someone special.
Thanks for hopping by! ~Kim
Supplies used: Colorbox Chalk Ink by Clearsnap: Yellow Ochre, Chive, Chambray, and Red Lipstick; Crafters Companion Shimmer Cards-White Pearl; AC White Cardstock; Pebbles Basics (blue dot) pattern paper; BoBunny Soft Shades Double Dot 6x6 pattern paper pad (red dots); Purple Onion Designs: Stacey Yacula Studio-Fireworks stamp; Versamark clear ink; Reverse Confetti: Celebrations stamp set; Ranger Designer Series Red Geranium embossing powder; Marvy Uchida Heat Tool; Sizzix Big Shot Die Cutting Machine; Gina Marie Designs: Fish Tail Banners die cuts; Ranger Stickles glitter glue: Pine, Xmas Red, Crystal, Waterfall, and Yellow; Doodlebug button; Copic Marker #B24-Sky; Quikstik; Michaels printed ribbon; AC red/white bakers twine; My Minds Eye Enamel Dots: Jubilee Mint Julep “Beautiful,” Jubilee Tangerine “Awesome,” and Necessities-Reds; Glue Dots medium and mini; Blue Painters tape; Scor-tape by Scor-Pal; and Bazzill Marathon Adhesive Runner

















 RSS Feed
