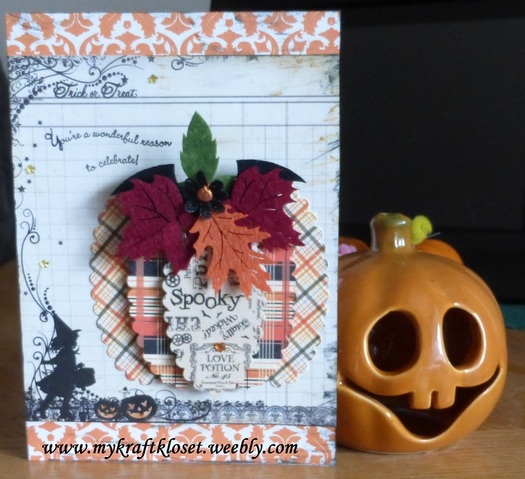
To create the 3D pumpkin, I looked through all my favorite fall or Halloween pattern papers, and there was A LOT, to choose which ones would be the ovals. This is a great way to use up scraps or use several paper favorites. Once I decided which ones I was going to use, I die cut five scallop ovals, ran through my Big Shot, and put aside, until I figured out the background.
I came across this adorable pattern paper with a girl witch trick or treating by Authentique and thought this would be perfect. It was too small to fill the whole card, so I trimmed it, and put aside to look for another pattern pattern to add to the top and bottom of the card.
I found this orange patterned pattern by Echo Park that reminded me of bats. It also coordinates nicely with the other patterns I planned to use and didn't take away from the 3D pumpkin. I cut two orange printed strips, about 2 x 5" and adhered to the top and bottom of the card base.
Take the "trick or treat" girls witch paper and ink around the edges with orange and black, center, and adhere to card base. Leaving about an inch at the top and bottom to see the orange pattern paper.
Now to build a 3D pumpkin. I started with two of the same scallop ovals on the bottom and adhered to the "trick or treat" panel with just an adhesive runner. Pop dot the next same two scallop ovals, leaving some room to see the bottom ovals, and pop dot the final scallop oval in the center.
Stamp sentiment to the left of the pumpkin. I used Versafine onyx black (my favorite for details and sentiments) and just kept it simple and didn't heat emboss, but you certainly could. Or orange ink would look cute too!
Next layer the felt pieces. I used a green 3 leaf to resemble a pumpkin handle, added a black bat to add some black, added maple and oak leaves, a black flower, and pumpkin brad to hold it all together. Adhere with glue dots to the top of the pumpkin, but making sure to not cover up the sentiment.
Add the little details. Color in the black pumpkins on the bottom with an orange glitter pen. Added some sparkle on a few swirls with a clear glitter pen. I had clear adhesive stars, so I colored them in with a yellow Copic marker, and added three yellow stars. I also colored a clear heart with an orange Copic marker and added it to the center scallop oval on the pumpkin.
Supplies:
Recollections card/envelope sets
Echo Park "The Apothecary Emporium"- orange strips
Authentique "Thrilling"- trick or treat witch panel and middle plaid oval
DCWV "The Ghosts & Goblins" matstack- sparkle bottom plaid oval
Graphic 45 "Steampunk Spells"- center spooky/love potion oval
Big Shot
Spellbinders Nestabilities 5 Mega Scallop Ovals Large
Creative Impressions felt pieces: bunches of leaves, Black sheer blossoms, Halloween (bat), and Halloween brads
Versafine onyx black ink
Stampin Up retired sentiment set- Curvy Verses 8pc 2004
Ranger Tim Holtz mini Distress Inks: Black Soot and Spiced Marmalade
atYou Spica clear and orange glitter pens
Copic markers-Y15 Cadium Yellow, &R07 Cadium Orange
Recollections adhesive stars and heart gems
Glue Gloss-for adhering gems for mailing
Inside Sentiment: Rubbernecker.com "many happies"
Tombo MONO adhesive runner
3D Pop Dots
Glue Dots
Finished card size: 5x7"


























 RSS Feed
