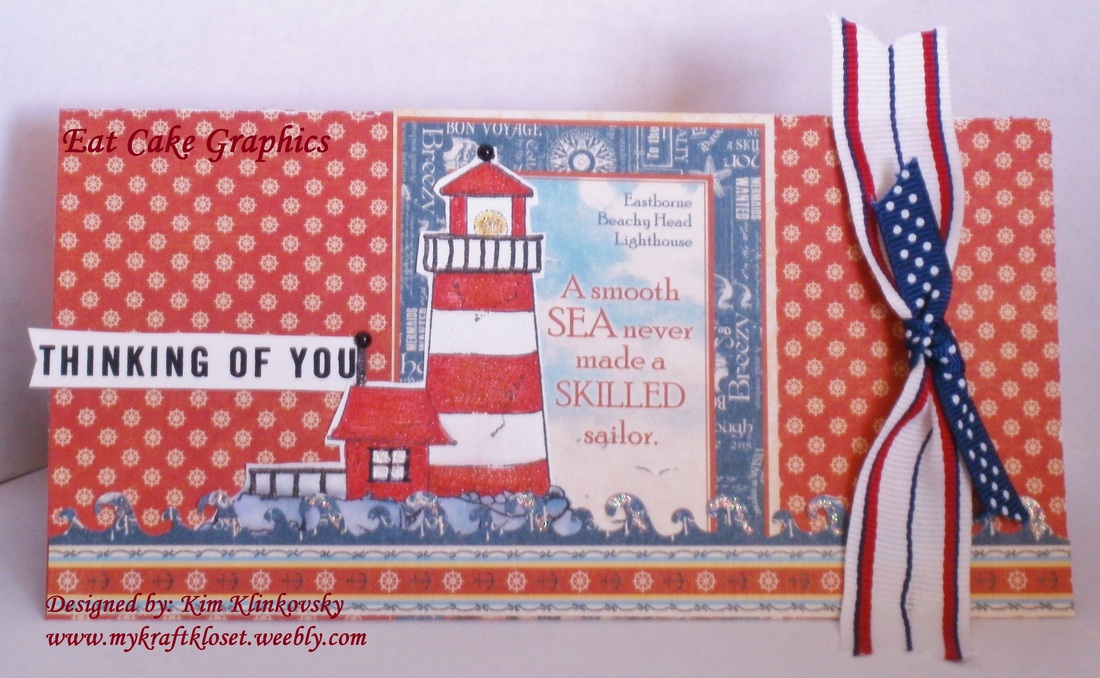
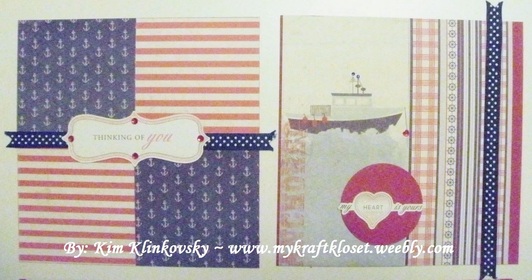
Red, White, Blue and "Thinking of You"...as I'm dreaming of a sandy beach, waves crashing on the rocks, the warm sunshine on my face, and a fruity drink. Oh! And lighthouses too! I just love them. Don't you? Which one is your favorite? They remind me of family vacations and you can feel all that history when you're standing in front of them. Which say all American to me and I love sharing that history with my kids. So I wanted this card to be red, white, and blue in all it's patriotic glory. And this Eat Cake Graphics lighthouse stamp goes perfect with this Graphic 45 nautical paper collection. Don't you think?
6 Comments
Hi everybody! I’m up on the CardMaker Blog today sharing my last post for the Blog Team and Celebrating my 20th Wedding Anniversary today too! I wanted to go out with a bang and this one is jam packed with lots of pictures, tips, party, and décor ideas to spruce up your celebrations. So, be sure to hop over there and see how I combine card making supplies with upcycled party favors to create a bash to remember. See all the re-purposed decorations up on the CardMaker blog "here."
Happy 20th Anniversary to my hubby! I Love You ~Kim Happy Birthday, America! Let's Celebrate our Independence! Well, almost. But first, I thank you for joining me and the super talented designers from the CardMaker Blog Team and the Clearsnap Team, as we Blog Hop together today sharing our one of a kind projects using amazing Colorbox Chalk inks. (see tutorial and a supply list below) Challenges: DoubleClick - AKA Abusybee-Challenge: For a Man or Boy! Little Tangles Challenge #69- Embossing Split Coast Stampers Challenge: CAS383-Good Ole Red, White, & Blue CAS-ual Fridays: CFC151 -- Color Challenge Hip Hip Hooray! Join me and the the talented designers from the CardMaker Blog Team and Reverse Confetti as we celebrate a Blog Hop! We're sharing one of a kind projects using these super fun stamps and die cuts. So, make sure to hop to each Blog, check out each amazing project, and write a quick comment (we love comments). Click "Read More" and let's get hopping and see what everyone created...
Hi everybody! Are you a fan of the *NEW* Ranger Tim Holtz Distress Crayons? I'm not sure yet, I need more practice, I think. They are different than you think and take some getting used to. I was given a set of the neutral color pack to play with and I've tried them a couple different ways. And I will tell you...experiment with various paper types, baby wipes, your fingers, and water to see the different effects you can get with these crayons. Because they do react and blend differently than what you are used too. See below for tutorial and supplies...
Challenges: Little Red Wagon-Let's Hear It For The Boys DCC511 ~ Use Your Leftover Supplies & Paper Skip to my Lou-Made by you Monday
Happy Wednesday everybody! Hop along with me and my talented team of designers from the Cardmaker Blog & American Crafts. As we each share lots of wonderful, vibrant, spring projects from the super talented Amy Tangerine's *NEW* Better Together Collection. WOW! What fun we had creating projects from this amazing collection of shapes, bright colors, fun patterns with a retro twist, and lots of really great embellishments. See below for Blog Hop list, tutorial, and a list of supplies I used...
You still have time to make quick and easy Valentines cards for your loved ones. I made these for my four kids with one paper kit that included coordinating paper and stickers, in addition to a heart stamp set.
The first card is for my daughter and I wanted it pink, glittery, and very girly with lots of sparkly bling. Her card is layered paper, stickers, glitter ribbon, adhesive heart gems, and has No stamping. And for my three son's I wanted their cards masculine, simple, red, and full of hearts. These are quick and easy cards for not only Valentines day, but also birthdays, anniversaries, and any day you want to show your loved ones you care. Happy Valentines Day! ~Kim Hi everybody! I'm up on the CardMaker Blog today sharing tips on how to make nice, easy, cards, in a flash. I created a card template (below) and I'm happy to share with you all. I've done all the math and measuring for you and this template makes it so fast and easy to cut all your pieces. All you have to do is cut and paste. These two cards were created from examples 1 and 2. Go check out all six cards I made in less than 10 minutes and all the materials I used up on the CardMaker Blog. Once you master these six examples you can now make 24+ cards from one 6x6 paper pad in less than an hour. Really! And I'm happy to say this is another project I created with NO stamping! So, get out your pretty paper pads you've been hoarding and get started making cards. ~Kim
Do you make cards for Valentines Day? Sometimes I do, time permitting, and this year I had time to play with these gorgeous papers, stamps, and stickers. So, whether you celebrate Valentines Day or not here are a few ideas for some quick cards to make and give your loved ones on the 14th or anytime of year.
It doesn't have to take a lot of supplies to make cards. I recommend using a kit or a collection because your paper, stickers, and sentiments all coordinate. I have four kids, so I wanted to make each of them a card. I started with kraft cardstock as my card base on all of them, layered pattern paper and added these wonderful stickers or stamped images. See tutorial and supplies listed below... Happy Fall Y’all! I LOVE-LOVE-LOVE this time of year when all the leaves change colors and the elk and moose come out in abundance. I made this wonderful card for my design team Eat Cake Graphics. This incredible stamp is one whole piece and reminds me of my gorgeous Rocky Mountains with it's shimmery snow capped mountains, green pine trees, and the moose...
Happy Birthday, Dad! As promised, lots of Fall birthday cards coming your way! Not that you can tell from this picture, but I started with a kraft colored card base. I painted a strip of the top and bottom of the card and a button with a gold paint pen. To make it shimmer like Fall.
On a piece of white cardstock I stamped one of my favorite SU (retired) leaf stamps, from the Fall Whimsy set. Sorry, gotta use what you have. But you can still find this set online. I combined the leaf stamp with a script stamp from Penny Black, and a sentiment stamp, to create this unique stamped image layered upon a one of a kind watercolor background. See complete instructions for this stamping, masking, and watercolor techniques in the Autumn 2015 issue of CardMaker Magazine. Supplies: Kraft and white cardstock; Carta Bella Autumn 6x6 pattern paper pad; Krylon gold paint pen; Stampin up stamps-Fall Whimsy (retired); Doodlebug button; twine; Versamark clear ink; Orange embossing powder (Ranger or Zing); Tim Holtz mini dye ink pads: rusty hinge, dried marigold, scattered straw; and glue dots. Shared this card on: Skip to my Lou-Made by you Mondays I am so excited and honored to be the guest designer this month for: The Paper Girls Challenge #88 Sept 21 - Sweater Weather Who’s ready for sweater weather? I love this time of year when the leaves are changing, the air is getting cooler, pumpkin is everywhere, and you start seeing the patterns of the season. And we have a lot of Fall birthdays in my family, so you will see a lot of birthday cards in the coming months. This week I was inspired by the plaid sweaters you see this time of year and created this card with my sister, Tami, with NO stamping. None! I know, right? We were stunned too! LOL We started with a red card base and a square punch (one inch or 1.5"). And punched out our squares from three different pattern papers from the same coordinating 6x6 pad: green, brown, and plaid. Then ran them through the Xyron sticker maker, cut the squares in half, and adhered them to another square. Layered the squares in a pinwheel quilt pattern to a larger red square and adhered to a larger brown square to create a frame or a double matte. Add some colored adhesive pearls for some shine, add buttons, bakers twine, and a tag sentiment. And you have a great masculine card or a neutral card for Fall, Christmas, or any occasion. Plaid isn't just for the holidays! Supplies: AC red blank cards; Authentique: Believe Collection 6x6 pad; Square Punch; Adhesive pearls; Doodlebug buttons; AC bakers twine; Pebbles banner sentiments; Glue dots; and a Xyron 1.5 sticker maker Now lets see what you can make with a little imagination for our next theme "sweater weather" and enter your creations. Click the logo picture below for more details on how to enter by Sat, October 3rd. Good luck! I also entered this card in these challenges:
52 Christmas Card Throwdown Challenge-For a Man Little Red Wagon Challenge #307 - Try Something New Skip to my Lou - Made by you Monday Sun, sea, and sand is the theme for this weeks challenge and I don't know about you, but I LOVE being on the water. And I"m lucky my hubby's a nautical person, so I make a lot of "boat" type cards for him. I used this wonderful SU stamp set to set the tone. I could have added a lot more color and bling to this, but I wanted to keep it simple and natural and let the plaid pattern paper pull the colors together. And used my copic markers to color some pastel button brads a brownish rust color. I love using alcohol markers to change the colors of gems, pearls, brads, and metal embellishments to name a few. I hope you're enjoying your summer and get out on the water too!
I entered this card in: 4 Crafty Chicks Challenge: 4 CC #256 {Sun, Sea and Sand!} Sun, surf, and sailing all remind me of summer. And I don't know about you, but I LOVE being on the water. For this "beach" themed challenge I combined sailing with the beach boardwalk. Doesn't it look like those planks on the dock? I used this adorable sailboat stamp and added some bling with glitter pens and adhesive gems, cut out with my wavy decorative scissors, and inked the edges. Inked a blue streak down the middle of this boardwalk pattern paper by "My Minds Eye-on the bright side" to mimic water. Then popped it up for some dimension. Added this adhesive burlap star and American Crafts natural twine. I usually leave my cards blank inside, but this was for my hubby, so I can show you. I found this free quote "here" that fit perfectly, printed it in color on white cardstock on my printer, cut it out with wavy decorative scissors, and matted on blue cardstock. Happy Anniversary! I entered this card in: 4 Crafty Chicks Challenge: 4 CC #256 {Sun, Sea and Sand!} Little Red Wagon Challenge: Challenge #298 - Beach Theme 4 Crafty Chicks Challenge: 4CC #255 - Clean and Simple or CAS Trains, planes, and automobiles...Oh my! Is my theme for this very simple Father's Day card. I used a piece of fourth of July pattern paper as my background and adhered it to cardstock as my base. I like 100lb cardstock or greater makes for a sturdy card base. I stamped on white cardstock with blue distress ink, and used two different size circle punches to punch out the stamped images and dark blue circles and adhered to card. Then stamped my sentiment with the same blue ink and added some bakers twine.
Supplies: Bazzill Coconut Swirl and Navy cardstock Pattern Paper Technique Tuesday stamp set-All Aboard Stampin Up sentiment (retired-sorry) Ranger Tim Holtz mini ink-Chipped Sapphire American Crafts-bakers twine Circle Punches: 1.5" and 1" I entered this card in: 4 Crafty Chicks Challenge #251 - Father's Day WIW Color Challenge ~ Red, White & Blue LOL...I bet my title GOTCHA!!! My hubby turns the BIG 5-0 and I wanted to make something really fun and different for his birthday and this is what I came up with. I can't take all the credit...I got the title idea from Pinterest. I dug out my Cricut and cut all the letters and numbers. I love pattern paper, plaid, and my hubby loves blue, so that was a perfect match...
My twin boys just turned 12yrs old. Where does the time go? Next year I will have three teenage boys under one roof. Help me now! LOL
I always make two cards, as they're two different people, so they get their own card. Sometimes their cards are different and sometimes they are the same design. This year they are into Minecraft video games, so I decided to make them both Minecraft cards. It's hard to find masculine cards, but Pinterest (click link for ideas) has made it easier to find ideas. You can search for anything, sort, and save your favorites. I punched a bunch of black squares, cut some in half, and made a couple rectangles to create this design. They loved them and I hope you do too! Stay warm and cozy wherever you are, as we're in for more snow. ~Kim Supplies: American Crafts cardstock Colorbox white ink Diamond plate embossing folder Square punch This is the card I made for my Dad. Happy Birthday, Dad! Yes, another Libra...we have a bunch of them in the family! Even with my husband and three boys, I still find it really hard to make masculine cards. There just isn't enough good patterned paper out there for masculine cards. I've been dying to use this sporty paper for months and finally got around to making something with it. I thought the "football" theme went pretty well with the Fall season and my Dad LOVES football. Believe it or not, but I did NOT stamp at all on the front of this card...just the inside has a simple stamped birthday sentiment. And I think it turned out pretty good, I just cut and layered different paper pieces from the same collection. I love the red plaid against the black random numbers. It reminds me of football jersey numbers. I love to collect 6x6 collection pads for card making. The paper pads make it easy to coordinate the different patterns and colors.
Supplies: Graphic 45 "Good ol' Sport" American Crafts red twine Doodlebug Button 3D pop dots Tombow MONO Adhesive Permanent runner 5" x 7" finished card |
Hi! Welcome to
My Kraft Kloset I'm Kim Klinkovsky, a Published Card Maker, Blogger, Scrapbooker, Jewelry Maker, Wife to an US Army Veteran, Mom to 4 kids (including twins) and this is my crafty place. It's interrupted by life, fueled by coffee & sweet tea or a cocktail--Ha! And where I share all my crafty adventures. *** Follow Social Media Channels above to see more! ©2013-©2024 *** ***
I, Kim Klinkovsky am the legal copyright holder ©2013 - ©2023 of all the material (pictures, text, & artwork) on this website and blog. It may not be used, reprinted, copied, submitted, sold, or published without my written consent. *** I'm on a couple Design Teams and in a few affiliate programs that have given me products to try or use, but my opinions are my own and I use what I like. Affiliate links are listed below and listed in the supply lists of my projects. They allow me to receive a small commission if you click on those links or purchase any products, at no extra cost to you. It helps me contribute to my family & keeps this blog going. Thank you for your support! Affiliate Links:
Design Teams: Publications Awards: Categories
All
Archives
April 2024
Past
Design Teams: FTC Declaration:
**As a designer I occasionally receive product(s) to use in some of my posts. Some posts may contain Affiliate links at no cost to you.** Stamps and other products shown on this website/blog may have been donated for promotional purposes by the company(ies) named in the post. All opinions are my own and Affiliate links and programs help to support my family and keep this site going. Disclosure Statement for Affiliate Links Policy is valid from: 31 December 2013 To get your own policy, go to: www.disclosurepolicy.org |