I entered this card in:
The Crafters Cafe Challenge: #127 - Use Some Buttons - 29 July, 2015
|
I'm a mom of one daughter and three sons and I get tickled pink when I get to make cards for girls. This adorable card is a throwback to Stampin' Up and I dug out some retired stamps that are still my favorites. For this adorable card I used itty bitty background stamps with versamark clear ink to create a unique soft background. Tied ribbon around a strip of polka dot pattern paper and adhered to card panel. Used the crib notes stamp set for the pig and sentiment, which I stamped with versafine onyx black, colored in with SU watercolor markers, and added an adorable tiny button for the nose. I recommend glue dots for adhering buttons or you can use a button brad. Punch out the pig and matching pink circle and adhered to pink panel. Take the whole pink panel and adhere to teal card base and add some random stickles diamond glitter glue to some polka dots for sparkle. See what you can do with buttons and get those stamps out and play!
I entered this card in: The Crafters Cafe Challenge: #127 - Use Some Buttons - 29 July, 2015
1 Comment
It's heating up here in Colorado and what better way to cool us down than to think of Christmas in July. I always make thank you cards after the holidays and I made this adorable card for the 52 {Christmas} Card Throwdown and just love this little snowman easily made with just punches. I started with a snowflake embossed background, added a snowflake brad, and adhered to card base. I tore white cardstock, inked it up, and added some stickles glitter glue for some sparkle, adhered to card and stamped sentiment. Punch out three circles (2", 1.5", and 1") for the body, a 1 1/4"
square punch for the hat, and a snowflake punch for the arms and popped up the body for dimension. Added some ink and stickles, an adorable face, and a colorful scarf. Hope your staying cool, drink lots of water, and please keep your dogs and kids safe this summer. I entered this card in: 52 {Christmas} Card Throwdown: Theme Challenge (52CCT29-15) CraftySteals Third Thursday CHRISTMAS IN JULY Challenge! The Crafter's Cafe Challenge: # 126 - Christmas in July - 22 July, 2015 After four boys a friend of mine FINALLY had a baby girl!!! Yes, baby #5! Congratulations! As a mom of one daughter and three sons, I get it. And I rarely get to make girl cards. So, when I do, they tend to be frilly and pink, but this one I wanted a sweet vintage look. I got out my Slice machine, yep, I still have one and still love it. It's light and portable and can do tons of quick cuts, titles, numbers, etc... I used the baby slice design cards for the onsies and the number die cuts; pink baby DCWV pattern paper; a soft eyelet border punch; inked the edges in a soft chestnut ink; adhered to a kraft colored base card; and finished with a soft ribbon and button.
I entered this card in: The Paper Girls Challenge #83 - Babies! I made 50 of these all occasion cards, in the same layout, but with different colors, patterns, buttons, ribbon, and fruit. There were strawberries, lemons, oranges, cherries, and grapes. See below and my Gallery for more card ideas. It's a very simple all occasion card for those moments you need a card. See what you can make with stamps and buttons for a great monochromatic look for any occasion.
Supplies: Basic stripe paper Bazzill purple cardstock EK Success border punch (one of my favorites) 3" scallop circle punch (use your die cut machines or framelits/spellbinders) Doodlebug buttons AC premium ribbon Stampin Up fruit stamp set (retired) Ranger Tim Holtz mini inks: peeled paint and black soot Finished card: A2 = 5.5 x 4.25" I entered this card in: The Crafters Cafe Challenge: #127 - Use Some Buttons Trains, planes, and automobiles...Oh my! Is my theme for this very simple Father's Day card. I used a piece of fourth of July pattern paper as my background and adhered it to cardstock as my base. I like 100lb cardstock or greater makes for a sturdy card base. I stamped on white cardstock with blue distress ink, and used two different size circle punches to punch out the stamped images and dark blue circles and adhered to card. Then stamped my sentiment with the same blue ink and added some bakers twine.
Supplies: Bazzill Coconut Swirl and Navy cardstock Pattern Paper Technique Tuesday stamp set-All Aboard Stampin Up sentiment (retired-sorry) Ranger Tim Holtz mini ink-Chipped Sapphire American Crafts-bakers twine Circle Punches: 1.5" and 1" I entered this card in: 4 Crafty Chicks Challenge #251 - Father's Day WIW Color Challenge ~ Red, White & Blue Scrap It Girl announces its June craft challenge. I hope you all will participate. You have until the end of the month to create and submit your creations for a huge crafty prize pack, a winners badge for your blog or social media, and recognition for your work. The SIG Designers will comment on your blog submissions and then vote for our favorite. The winner will be announced the first week of the following month.
June Challenge: Brads, Buttons, and Bling (click here for more details) This month’s theme is anything that includes all three: brads, bling, and buttons. Now time to get to work... May is also the month for many graduations: elementary, continuation, high school, college, etc... When I saw this stamp from Eat Cake Graphics of Hank (the dog) riding on his Hoover vacuum, I knew I wanted a banner behind him announcing the occasion...
Sophie Willoughby has a card for her Mom for Mother’s Day. When I saw this adorable stamp from Eat Cake Graphics Stamps it had a letter addressed to Santa. Which would be cute for Christmas or a Birthday card too! But I wanted to mask it and make it a card for Mother’s Day...
Scrap It Girl announces on the 1st of each month a new craft challenge that I hope you all will participate in. You have until the end of each month to create and submit your creations for a crafty prize, a winners badge for your blog or social media, and recognition for your work. SIG Designers will then vote for their favorite and the winner will be announced on the 1st of the following month.
April Color Challenge: Black, White & 1 Other Color! (click here for more info)... Scrap It Girl
April Color Challenge: Black, White & 1 Other Color! (click here for more info) This month they are focusing on color. Black, White, and one other color of your choice and that's it, just three colors. And yes, black and white count as colors. Create 1 or 2 projects that are cards, layouts, home decor, or anything that is homemade by you... My twin boys just turned 12yrs old. Where does the time go? Next year I will have three teenage boys under one roof. Help me now! LOL
I always make two cards, as they're two different people, so they get their own card. Sometimes their cards are different and sometimes they are the same design. This year they are into Minecraft video games, so I decided to make them both Minecraft cards. It's hard to find masculine cards, but Pinterest (click link for ideas) has made it easier to find ideas. You can search for anything, sort, and save your favorites. I punched a bunch of black squares, cut some in half, and made a couple rectangles to create this design. They loved them and I hope you do too! Stay warm and cozy wherever you are, as we're in for more snow. ~Kim Supplies: American Crafts cardstock Colorbox white ink Diamond plate embossing folder Square punch It's currently 4* degree's outside, maybe colder with a wind chill factor, and my craft room is in my basement...so I am NOT down there. But my desk downstairs would look pretty much like this too! LOL. No matter how many layers I put on, it's too cold to be down there. So, I've taken over my dining room table, while my kids are at school, and this is what it looks like when I make cards. I surround myself with my "stuff." Don't you? I love my 1x1" Tim Holtz mini distress inks, many punches make life easier, and all kinds of ribbon.
I've got a few more birthday cards to make, and maybe some Thanksgiving cards, before I can work on Christmas cards. So, I will post those cards soon. What are you working on? Do you make Thanksgiving cards or Christmas cards? Don't forget to check out my crafty pages for daily deals or ideas on craft products for your upcoming holiday cards/gifts: 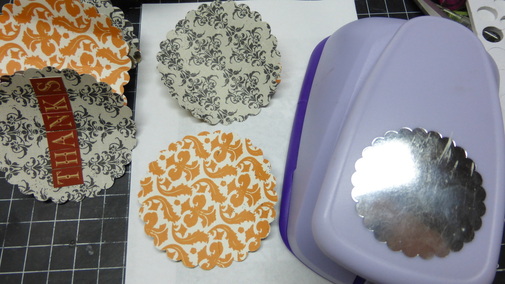 A treat box for any occasion, right at your fingertips, even your kids will be excited to help too! Punch out nine circles with a 3" scallop circle punch and fold each circle in half. Take two circles, match them up, glue dot each side ( I used about 3 glue dots on each side), and repeat until you have a complete circle. You could use staples or eyelets and thread ribbon to hold the circles together too. Take your last circle, which will be the bottom circle, and hot glue your attached circles around the bottom edges and place on the bottom circle for stability. Hold in place until it cools and add "thanks" stickers. I added a sandwich baggie full of treats, tied a metallic ribbon around it, and added a gift card for one of my kids teachers. And there you have a fast, little project for Halloween treats, thank you gifts, holiday gifts, and so much more! Supplies: Echo Park "The Apothecary Emporium" printed paper Graphic 45 "Olde Curiosity Shoppe" Alphabet Sticker sheet 3" scallop circle punch by Marvy Uchida Glue dots small Hot Glue Gun I LOVE Halloween so much I created an album just for scrapbooking our Halloween Memories. I created this page from some of my favorite things and favorite papers. I started with a 12x12" piece of kraft cardstock as my base. I used another piece of kraft cardstock, border punched the edge, backed it with purple cardstock, and adhered to the base page. Then layered several printed papers that all coordinated together and border punched down the left and right sides. I like how the colors, swirls, and edge punches all coordinate together.
I drew inspiration from the colors in my kids costumes and added a double matted border around their picture and adhered to the page. Added diamond rub-ons to the bottom right side that matched the colors on the page. Wrapped the page with black twine that resembled a spider web. Flowers aren't just for Spring and Summer anymore, as I embellished with a flower die cut to create a "spooky" embellishment by using Halloween printed paper. Cut 3-4 flowers out and layer each flower with black mini pop dots for added dimension, add layered buttons, and adhered to the page with glue dots. Stamp sentiment "OCT" on an office tag or die cut tag, heat emboss, ink edges, and wrapped with black twine, and adhere to page. I love ribbon, buttons, and gems. So I had to add them to this scrapbook page too. I cut several different ribbon pieces, scraps would work too, that coordinated with this page and adhered them to the office tag, added layered buttons, and adhered with glue dots. Add a sticker over the bottom ribbon for an extra title and added gems for some sparkle. I find glue dots work the best for adhering ribbon, buttons, and gems. I hope I have inspired you to make something "spooky" of your own. ~Kim Supplies: Bazzill Kraft Cardstock;Fancy Pants "Oct 31" printed paper, ribbon, buttons, and rub ons; Big Shot; Flower die cut; Tag die cut; Tim Holtz Cirque Alphabet stamp set; Versamark watermark clear ink; Inkadinkadoo Black embossing powder; Heat gun; American Crafts ribbon and twine; Martha Stewart double loop border punch; Fiskars scallop border punch; Hero Arts adhesive gems; 3D black mini pop dots; Glue Dots micro and small; Tombow MONO Adhesive Permanent runner Happy Birthday lil' Sister!
Yes, our Fall birthday's continue. I love Fall A LOT and usually make everybody cards with a Fall theme, but for my sister this year I wanted to do something different. One of her favorite colors is purple, so this is me, going all out for purple...see tutorial below... Happy Birthday, babies!
My adorable twin niece and nephew turned 1 year old this month. What a year and so blessed they have joined our family! As I've mentioned before, there are A LOT of Fall birthdays and A LOT of cards to share with you this month. These adorable Sesame cards I created from free clip art I found on the internet and just printed them on white cardstock via my color printer. The clip art was already colored in, so I didn't have to do that step. But you could totally print it in black/white and color it in yourself. I've been playing around with layering, punches, and framelits lately and these creations are what came out of that. It's not often I get to make a "girly" card, so I enjoyed searching for purple and pink things to compliment this card, and thought "Abby Cadabby" resembled my niece. My happy, smiling nephew always has his mouth open, so "Cookie Monster" definitely worked for his card. Supplies: Bazzill solid cardstock October Afternoon "sidewalks" 6x6 paper pad My Minds Eye "hootenanny" 6x6 paper pad American Crafts Premium ribbon Sizzix Circle Framelits 2.5" and 3" Circle punches 3" Scallop circle punch Glue Dots small Tombow MONO Adhesive Permanent runner 5 x 7" finished card sizes 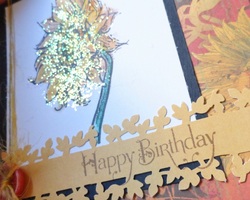 This is the card I made for my mom. Happy Birthday mom! I have loved this stamp set for a while now and I finally made a card with it. As with a lot of our supplies, we "collect" them and don't use them right away. So, I've been challenging myself every month to pick a stamp set I haven't used and make something. Next month I will show you my Christmas card I'm making with a stamp I've never used. I challenge you to do the same and USE your crafts! Sorry, this stamp set and printed paper is discontinued, but you might find it on eBay or Amazon. But you can still use other types of Fall printed paper or other sunflower stamps to recreate this card. It's a great design for any occasion any time of the year. Supplies: Bo Bunny "Forever Fall" pattern paper Bazzill black and white cardstock Close to my Heart "Friendship Bouquet" stamp set Ranger/Tim Holtz Distress Ink "Twig" Stampin Up watercolor crayons H2O brush Crafty Secrets clear art stamps "Grand Greetings" Fiskars leaf border punch Ranger stickles "icicle" glitter glue American Crafts twine button Glue Dots micro Tombow MONO Adhesive Permanent runner 5" x 7" finished card I entered this card in: Little Red Wagon-Challenge #297 ~ Birthday Theme The Paper Girl's 82nd Challenge: HAPPY BIRTHDAY!!! 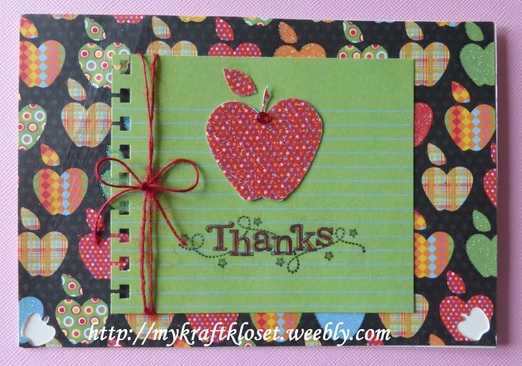 Do you thank your kids teachers? I do. As the school year winds down to it's final days, I reflect back on the year. I like to thank my kids teachers for all their efforts and hard work. Just a little something to show our appreciation. I love all the different school papers and tools out there I can play with to come up with something simple, but nice. Supplies: DCWV school themed paper pack, red twine, Stampin Up sentiment stamps, $1 apple punches from Michaels, EK Success border punch (I love this punch, looks like school paper edges), red gems, and red glitter pen. Finished card is A7. 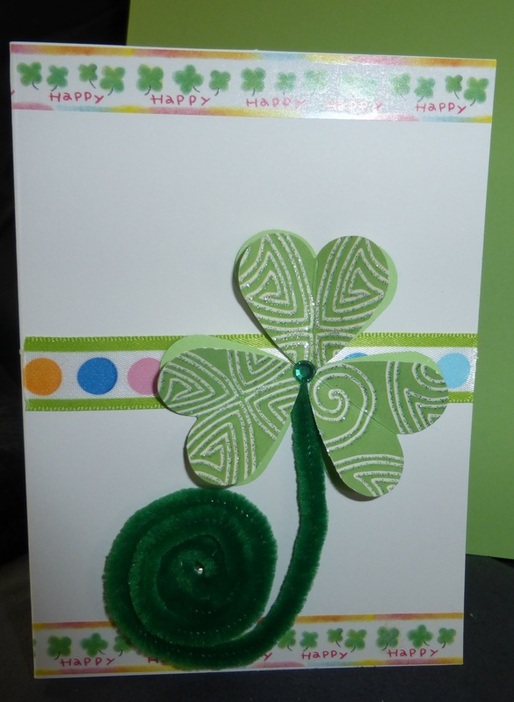 I made a quick St. Patrick's Day card for my twin niece and nephew's to commemorate their first green holiday! Very simple card with shamrock washi tape, American Crafts ribbon, a heart punch, gems, and a pipe cleaner. Voila! 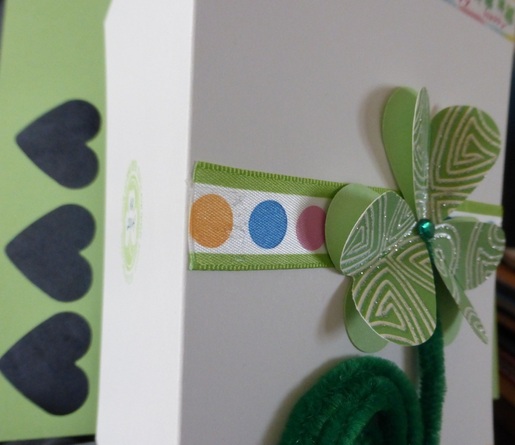 I punched out six heart punches: three from solid green cardstock and three from a printed green paper. I chose a paper that had an embossed raised sparkle to it, so I wouldn't need to add any stickles glitter glue. 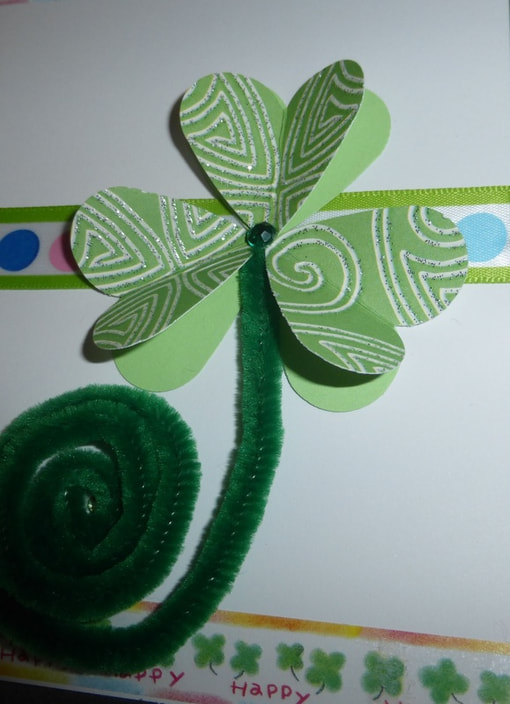 Adhere the solid green heart punches in a shamrock shape. Fold the printed heart punches in half, then apply a thin line of adhesive and attach directly on top of the solid green heart punches. Pinch for a 3D effect. Roll up a pipe cleaner and attach with glue dots. Add a couple gems and you have a quick and simple card. Here are some of my favorite creations using Graphic 45 Paper Collections, multiple techniques and layers. See the Gallery for more designs and details.
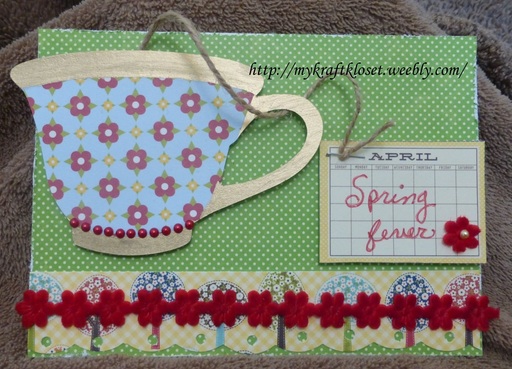 Happy Presidents Day! The sun is shining, no school today, my boys are outside playing, and I'm feeling crafting. Today I'd like to share with you a cup of tea...Jillibean Soup style. I cut the tea cup from a Slice design cartridge from the Jillibean Soup paper collection. Tip: I masked off the top, bottom, and the handle with blue painters tape. My favorite tape for masking or holding down thin die cuts! It won't stick to your paper or anything. Very easily removed. I colored in the top, bottom, and handle with a gold leaf paint pen; added red pearl gems; and foam dots to pop it up. Tip: I love to re-purpose my tools and use them in different ways. On this card I used scallop decorative scissors and a handle hole punch for the bottom paper strip, but you could easily use any scallop border punch from Fiskars or EK Success too! Then I cut out the month April from the Jillibean Soup paper collection. I chose April for Spring and to give as an upcoming Anniversary card or birthday card. I wanted to make it look like a tea bag with twine and a staple for a 3D effect. You don't always have to craft things flat. It's fun to give your projects some dimension and to mix and match your tools and see what you can create. What are you doing today? 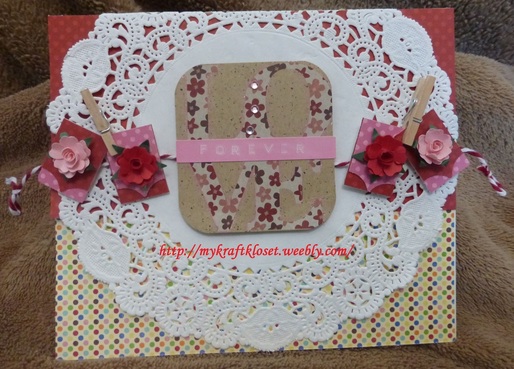 Happy Valentines Day! I just LOVE Valentines, but this card could be for any occasion you want to tell somebody you love them. Even Mother's Day. I used Jillibean Soup paper collections and tags. I added the doily, bakers twine, roses, gems, little banners, gems, and cute little clothes pins. I love embellishments. I used a corner rounder on the tag, square and heart punches for the banners. I wanted the "LOVE" to stand out a little bit more, so I traced the letters with a pink glitter pen. Have a great weekend! Tip: Using punches you have to make banners. I used a small square punch, cut the squares in half, and used the top of a heart punch to make the curves. Lay the bakers twine across the card, popped the tag and banners up with pop dots and laid them on the bakers twine. Ideas to get organized this new year...ribbon storage, stamp storage, stickles/glitter glue storeage, scrap paper storage, embellishment storage, and storage for border punches and more.
|
Hi! Welcome to
My Kraft Kloset I'm Kim Klinkovsky, a Published Card Maker, Blogger, Scrapbooker, Jewelry Maker, Wife to an US Army Veteran, Mom to 4 kids (including twins) and this is my crafty place. It's interrupted by life, fueled by coffee & sweet tea or a cocktail--Ha! And where I share all my crafty adventures. *** Follow Social Media Channels above to see more! ©2013-©2024 *** ***
I, Kim Klinkovsky am the legal copyright holder ©2013 - ©2023 of all the material (pictures, text, & artwork) on this website and blog. It may not be used, reprinted, copied, submitted, sold, or published without my written consent. *** I'm on a couple Design Teams and in a few affiliate programs that have given me products to try or use, but my opinions are my own and I use what I like. Affiliate links are listed below and listed in the supply lists of my projects. They allow me to receive a small commission if you click on those links or purchase any products, at no extra cost to you. It helps me contribute to my family & keeps this blog going. Thank you for your support! Affiliate Links:
Design Teams: Publications Awards: Categories
All
Archives
April 2024
Past
Design Teams: FTC Declaration:
**As a designer I occasionally receive product(s) to use in some of my posts. Some posts may contain Affiliate links at no cost to you.** Stamps and other products shown on this website/blog may have been donated for promotional purposes by the company(ies) named in the post. All opinions are my own and Affiliate links and programs help to support my family and keep this site going. Disclosure Statement for Affiliate Links Policy is valid from: 31 December 2013 To get your own policy, go to: www.disclosurepolicy.org |