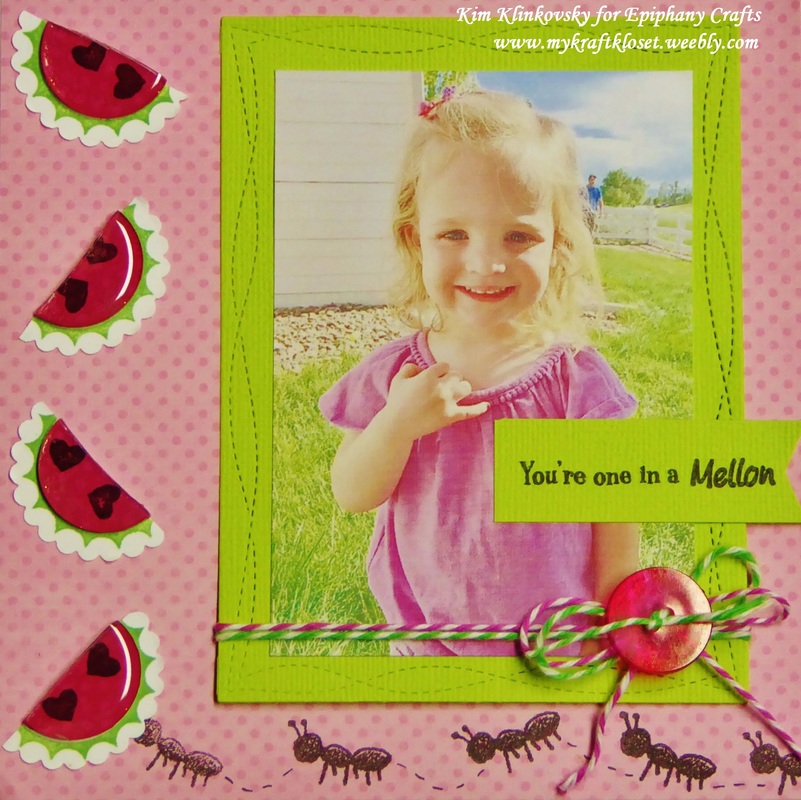
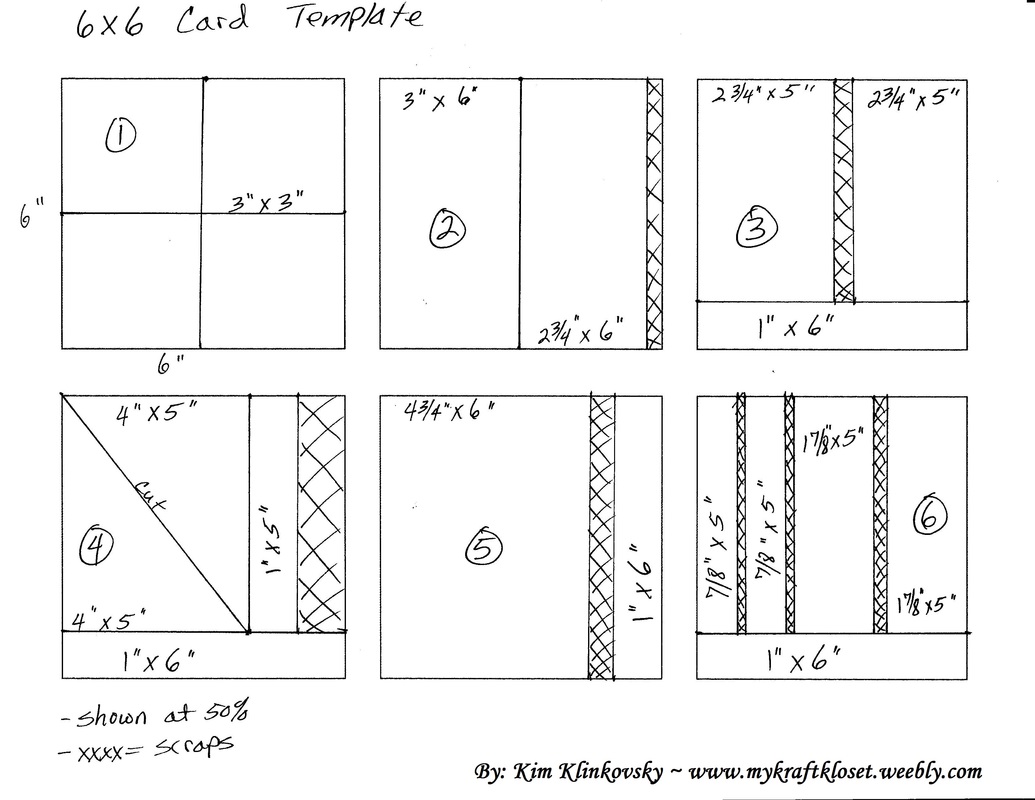
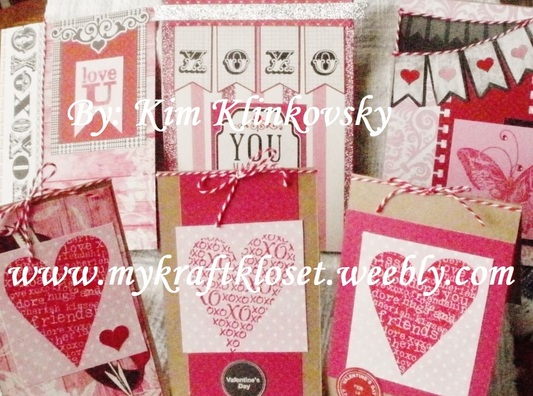
Nothing says summer better than kids laughing and playing outside, family picnics, and watermelon. Its summer fun at it’s best with Epiphany Crafts Tools. And this 6x6 page layout is perfect for those little moments, small field trips, summer family gatherings, or staycations you want to remember, but you don’t want to make a huge album for it. Plus, the kids love flipping through small albums and giggling at all the memories. Click "Read More" for tutorial and supplies...
3 Comments
Red, White, Blue and "Thinking of You"...as I'm dreaming of a sandy beach, waves crashing on the rocks, the warm sunshine on my face, and a fruity drink. Oh! And lighthouses too! I just love them. Don't you? Which one is your favorite? They remind me of family vacations and you can feel all that history when you're standing in front of them. Which say all American to me and I love sharing that history with my kids. So I wanted this card to be red, white, and blue in all it's patriotic glory. And this Eat Cake Graphics lighthouse stamp goes perfect with this Graphic 45 nautical paper collection. Don't you think?
Happy Birthday, America! Let's Celebrate our Independence! Well, almost. But first, I thank you for joining me and the super talented designers from the CardMaker Blog Team and the Clearsnap Team, as we Blog Hop together today sharing our one of a kind projects using amazing Colorbox Chalk inks. (see tutorial and a supply list below) Challenges: DoubleClick - AKA Abusybee-Challenge: For a Man or Boy! Little Tangles Challenge #69- Embossing Split Coast Stampers Challenge: CAS383-Good Ole Red, White, & Blue CAS-ual Fridays: CFC151 -- Color Challenge Welcome to the 3rd Annual "Blogs 4 Boobies" Blog Hop with over 60 designers and sponsored by Skipping Stones Design (SSD). It's a 7-Day Event that I am honored to be a part of this great cause that is near and dear to my family, as we celebrate my little sister being “cancer free.” But not everybody is as lucky. We honor those we've lost; encourage those in treatment, fighting the fight; and we cherish those deeply who have survived. We salute all of you for your bravery and courage! We all know somebody...AND YOU CAN HELP US STAMP OUT CANCER!
Hi everybody! I'm up on the Blog today sharing some happy news with you all. Starting in June I have been selected to join the incredibly talented Epiphany Crafts Design Team. I am so honored and so excited to get crafting with these amazing products. Be sure to check out this manufacturer of innovative crafting tools, epoxy accessories, and charms that let you create your own unique, one of a kind, custom embellishments for cards, scrapbooks, jewelry, and so much more. The possibilities are endless. Here is my first project using my kids back to school pictures as my inspiration and all this wonderful pattern paper. I made all my embellishments from the amazing Epiphany Craft Tools by using the round punch and clear epoxy bubble stickers over cute school paper. And used the ticket punch as little tags to document each grade level of my kids pictures to make it extra special. I hope I've inspired you to make your own unique embellishments. Stay tuned for some awesome projects! ~Kim
Supplies used: Epiphany Craft Tools: round 25 punch and epoxy bubbles, ticket punch; DCWV back to school paper; Bazzill dot red cardstock; BoBunny Double dot pattern paper (tags); Creative impressions ruler ribbon; EK Success notebook punch; Authentique number stickers. Hip Hip Hooray! Join me and the the talented designers from the CardMaker Blog Team and Reverse Confetti as we celebrate a Blog Hop! We're sharing one of a kind projects using these super fun stamps and die cuts. So, make sure to hop to each Blog, check out each amazing project, and write a quick comment (we love comments). Click "Read More" and let's get hopping and see what everyone created...
April showers bring May flowers, except in CO...mother nature tends to toy with us and extend winter until the end of May. And it's been wet and cooooold! But that didn't spoil my Spring surprise for my Mom with this flowery card I made. Click "read more" for tutorial and materials list...
Challenges: WIW Photo Inspiration Challenge ~ M1816 Little Red Wagon Challenge #342- Blooming Fun! Simon Says-Wednesday Challenge: Flowers Little Tangles Challenge #68- Anything Goes Hi everybody! I'm sharing on the CardMaker Blog once again a technique that's an oldie, but a goodie—Ribbon Inking! Have you ever searched and searched for the perfect ribbon to match your project, only to come up empty handed and frustrated? Well, stop searching and create your own...like I did on this gorgeous folder embossed card I created with no stamping! Add some ribbon and flowers and you have a great card for many occasions like Mother's Day, Graduation, Wedding, Anniversary, Birthday, Thank you, and more. Get the step by step tutorial and all the materials I used over on the CardMaker Blog. Thanks for stopping by! ~ Kim
Challenges: Challenge #68- Anything Goes DCC511 ~ Use Your Leftover Supplies & Paper Simon Says Monday Challenge: Emboss It (folders, heat, or paste) Simon Says Wednesday Challenge: Flowers Hi everybody! Are you a fan of the *NEW* Ranger Tim Holtz Distress Crayons? I'm not sure yet, I need more practice, I think. They are different than you think and take some getting used to. I was given a set of the neutral color pack to play with and I've tried them a couple different ways. And I will tell you...experiment with various paper types, baby wipes, your fingers, and water to see the different effects you can get with these crayons. Because they do react and blend differently than what you are used too. See below for tutorial and supplies...
Challenges: Little Red Wagon-Let's Hear It For The Boys DCC511 ~ Use Your Leftover Supplies & Paper Skip to my Lou-Made by you Monday Hi everybody! I'm up on the CardMaker Blog sharing another fast and easy idea for making beautiful cards in 10 minutes that look like you spent all day. I created this gorgeous card for my parents to celebrate their 48th Wedding Anniversary! I absolutely LOVE pattern paper and this Authentique paper collection is just stunning. So, get ready to cut up those pretty papers you’ve been hoarding...I mean saving (ha!) and let’s get started. Get a step by step tutorial and all the materials I used up on the CardMaker Blog. Happy Anniversary Mom & Dad! Love~Kim and family
Challenges: Little Tangles Challenge #68- Anything Goes Skip to my Lou-Made by you Mondays Happy Wednesday...Who wants cake? Join us for an exciting Blog Hop and a Giveaway too! Hop along with me and the talented designers from the Cardmaker Blog Team and The Greeting Farm as we each share our one of kind unique projects using these fun and whimsical stamps. Check them out. They really have a great variety to choose from.
See tutorial below... Happy Thursday everybody! Hop along with me and the talented designers from the Cardmaker Blog Team and Ranger Industries. As we each share lots of wonderfully creative projects using the *NEW* Tim Holtz Distress Crayons. I can't wait to see what everybody created...
Happy Spring! I hope it's warming up where you are. We had 4" of snow just two days ago and today it's mostly melted, warm, and sunny. But it will snow again...that's just what it does in Colorado. It's also the day after my daughter's birthday, so I can share with you the card I made her. I wanted it bright and happy for Spring and this Amy Tangerine collection really delivered. I love this modern look with a retro a twist with the mod shapes and cassette tapes. First adhere the pink and yellow pattern papers to a card base. Punch out nine label shapes from four sheets of pattern paper, run through a sticker maker, and adhere to card. I layered two ribbons on top of this cool pink burlap ribbon. Add flower embellishments, enamel dots, music note stickers, and the "sweet life" sticker in the middle. And another card with NO stamping. ~Kim Challenges:
-Little Red Wagon Challenge #334- Happy Easter/Spring -The Paper Girls Challenge #100!!-pretty paper-friendships -WIW Photo Inspiration Challenge ~ M1616: I was inspired by the colors and the spots. -Skip to my Lou-Made by you Mondays Supplies used: American Crafts-Amy Tangerine: Better Together paper collection, stickers, and ribbon; SU label punch; Recollections Kraft card/envelope set from Michaels; My Minds Eye enamel dots; paper flowers; Creative Impressions leaves and brads; Xyron 1.5" sticker maker; Glue Dots; and Scor-Tape.
Happy Wednesday everybody! Hop along with me and my talented team of designers from the Cardmaker Blog & American Crafts. As we each share lots of wonderful, vibrant, spring projects from the super talented Amy Tangerine's *NEW* Better Together Collection. WOW! What fun we had creating projects from this amazing collection of shapes, bright colors, fun patterns with a retro twist, and lots of really great embellishments. See below for Blog Hop list, tutorial, and a list of supplies I used...
Happy Leap Year! And what better way to celebrate February 29th than a Blog Hop with my talented team of designers at CardMaker and
Faber-Castell. Make sure you hop to each Blog, check out each amazing project, and write a quick comment (we love comments). See complete Hop list, tutorial, and supplies below... Hi everybody! I'm up on the CardMaker Blog again sharing my craft spaces with you. I'll be honest, I was a little panicked when I got this assignment, as it's very personal to invite you into my space. So, be kind and don't judge me. I am working on reducing the amount of stuff I have. Really! My sister made me join a local sale to sell some stuff and maybe some stuff could be future giveaway prizes too! Plus, I can see the floor and easily walk around my space, so I am NOT a hoarder. (lol)
At the beginning of every year we tell ourselves to get more organized. Take a peak into my real space, see where I create, and how I organize some of my supplies. I'll show you how I organize my stamps and punches and so much more. Read more about my craft room, see more pictures around my space, and get a complete supply list of where I buy my organizers. Click "here" to go to the CardMaker Blog. I hope I've inspired you to get organized. Thanks for stopping by today! ~Kim Easter is Sunday, March 27, 2016 this year! So, that does not leave a lot of time to make cards. Do you make Easter cards? If so, post them on Facebook and show me what you've made. I'd love to see them.
I was inspired to create these fun flip card by the shapes and colors from "The House That Stamps Built" challenge. I love the pink, blue, and purple colors. And I think the bunny ears look like hearts. The sentiment I downloaded a printable and printed it from my computer in color on white cardstock and punched it out. ~Kim You still have time to make quick and easy Valentines cards for your loved ones. I made these for my four kids with one paper kit that included coordinating paper and stickers, in addition to a heart stamp set.
The first card is for my daughter and I wanted it pink, glittery, and very girly with lots of sparkly bling. Her card is layered paper, stickers, glitter ribbon, adhesive heart gems, and has No stamping. And for my three son's I wanted their cards masculine, simple, red, and full of hearts. These are quick and easy cards for not only Valentines day, but also birthdays, anniversaries, and any day you want to show your loved ones you care. Happy Valentines Day! ~Kim Hi everybody! I'm up on the CardMaker Blog today sharing tips on how to make nice, easy, cards, in a flash. I created a card template (below) and I'm happy to share with you all. I've done all the math and measuring for you and this template makes it so fast and easy to cut all your pieces. All you have to do is cut and paste. These two cards were created from examples 1 and 2. Go check out all six cards I made in less than 10 minutes and all the materials I used up on the CardMaker Blog. Once you master these six examples you can now make 24+ cards from one 6x6 paper pad in less than an hour. Really! And I'm happy to say this is another project I created with NO stamping! So, get out your pretty paper pads you've been hoarding and get started making cards. ~Kim
Do you make cards for Valentines Day? Sometimes I do, time permitting, and this year I had time to play with these gorgeous papers, stamps, and stickers. So, whether you celebrate Valentines Day or not here are a few ideas for some quick cards to make and give your loved ones on the 14th or anytime of year.
It doesn't have to take a lot of supplies to make cards. I recommend using a kit or a collection because your paper, stickers, and sentiments all coordinate. I have four kids, so I wanted to make each of them a card. I started with kraft cardstock as my card base on all of them, layered pattern paper and added these wonderful stickers or stamped images. See tutorial and supplies listed below... Love is in the air...but first I needed to make a February Birthday card for somebody special. And having three sons and one daughter, I rarely get
to make anything girly. So, when I do, I go all out. I wanted it pink and pretty. And I LOVE to mix and match pattern papers. See tutorial and supplies listed below... Hi Everyone! I'm excited to share with you my first Blog Hop sponsored by May Arts Ribbon & CardMaker. We were tasked to create something with gorgeous May Arts Ribbon with a Valentine's theme. This Blog Hop will give you a jump on tons of ideas to make for all your loved ones for the upcoming Valentine's Day, Anniversaries, Birthday's, and so much more. For this Hop, I created an A2 sized card from red cardstock, punched out several hexagon pieces, used shiny red metallic foil, and created this beautiful heart from this gorgeous adhesive rose ribbon. Click the pictures above for more instructions and see below for materials list and blog hop.
Thank you for all your kind words and support these past years I've been blogging and creating online. I truly appreciate it! I always make my own cards and send it homemade from the heart. A phone call or an email is fine, but my mother and grandmother always hand wrote thank you cards and I've always carried that tradition onto my kids. So, I have them each write a few sentences to thank everybody for their presents. Do you make your own thank you cards after the Holidays or do you get a box from the store? Whichever way, it's important to say "thank you."
Happy New Year! I just love this robot stamp from Eat Cake Graphics for so many occasions. Go check them out, they have great stamps that are very versatile for any occasion. I stamped the robots on cardstock, heat embossed in black, and colored with Copic markers.
Santa Claus is coming to town! I found some time to fit in a few more cards to share with you all. I came across this pattern paper that had a lot of my favorite holiday prints in rows all on one sheet. And thought this is perfect for a holiday card. The sheet music reminds me of all the holiday songs we sing this time of year. The argyle print reminds me of holiday sweaters, and the candy cane stripes. And this detailed Santa and his eight reindeer is a wonderfully detailed stamp from Eat Cake Graphics. Go check out their whimsically detailed stamps. They are just precious...
|
Hi! Welcome to
My Kraft Kloset I'm Kim Klinkovsky, a Published Card Maker, Blogger, Scrapbooker, Jewelry Maker, Wife to an US Army Veteran, Mom to 4 kids (including twins) and this is my crafty place. It's interrupted by life, fueled by coffee & sweet tea or a cocktail--Ha! And where I share all my crafty adventures. *** Follow Social Media Channels above to see more! ©2013-©2024 *** ***
I, Kim Klinkovsky am the legal copyright holder ©2013 - ©2023 of all the material (pictures, text, & artwork) on this website and blog. It may not be used, reprinted, copied, submitted, sold, or published without my written consent. *** I'm on a couple Design Teams and in a few affiliate programs that have given me products to try or use, but my opinions are my own and I use what I like. Affiliate links are listed below and listed in the supply lists of my projects. They allow me to receive a small commission if you click on those links or purchase any products, at no extra cost to you. It helps me contribute to my family & keeps this blog going. Thank you for your support! Affiliate Links:
Design Teams: Publications Awards: Categories
All
Archives
April 2024
Past
Design Teams: FTC Declaration:
**As a designer I occasionally receive product(s) to use in some of my posts. Some posts may contain Affiliate links at no cost to you.** Stamps and other products shown on this website/blog may have been donated for promotional purposes by the company(ies) named in the post. All opinions are my own and Affiliate links and programs help to support my family and keep this site going. Disclosure Statement for Affiliate Links Policy is valid from: 31 December 2013 To get your own policy, go to: www.disclosurepolicy.org |